Pages

Saturday, November 30, 2019

Masala Papad On Tawa Recipe

Masala papad recipe is crispy papad topped with spices onion-tomato mixture. It is a starter that is served in many Punjabi Restaurants. Crunchy, this is an ideal starter for serving with any meal! Nobody refuses Masala Papad, because it is light and appetizing, ensuring that you have enough place in your tummy for the upcoming meal. 

This dish is surely a delight when you have hardly anything in your party and feel that craving to relish something chatpata. This masala papad will be a great addition to your party table too. Who would thought that such a simple ingredient can be turned into something special! A simple, tasty, and elegant recipe that would get ready very quickly.


Author: Creative Baby
Recipe Type: Starter
Cuisine:  Indian
Serving:  2 Persons

Ingredients:

  • 2 Fried Papad
  • 1/4 cup finely chopped onion
  • 1/4 cup finely chopped tomato
  • 1 small finely chopped green chili
  • Salt to taste
  • 1/4 tbsp chaat masala
  • 1 tbsp Lemon juice
  • 1/4 tbsp red chili powder for sprinkling

For Garnishing

  • 1 tbsp finely chopped coriander leaves
  • 2 tbsp fine sev

How To Make Masala Papad


Step 1:

Mix together onion, tomato, green chili, salt, chat masala and lemon juice in a bowl. Mix well and keep aside.

Step 2

Spread this mixture on top of the fried papad evenly.

Step 3

Sprinkle red chili powder, coriander leaves, and sev on top.

Step 4

Your delicious masala papad is ready to eat. Serve masala papad immediately.


Previous                                  Home                                         Next


    Cheese Garlic Bread On Tawa Recipe

    A delicious Italian classic bread recipe perfect with soups, pasta, etc. Cheese garlic bread recipe for those folks who want a quick breakfast or brunch. on occasions, nothing beats a cheese garlic bread that you can have as a snack or serves with any soup for lunch or dinner. These can be served as a starter snack to a get-together or parties. All you need is a set of basic ingredients like garlic, butter, a loaf of bread and cheese and this super delicious appetizer is ready in absolutely on time.

    You can make cheese garlic bread in the oven. if you don't have an oven you can also make it on Tawa. Here I m sharing cheese garlic bread super easier recipe making on tawa or frying pan and without oven. The taste of this garlic bread is similar to the once we gen in pizza joints.


    Author: Creative Baby
    Recipe Type: Snack
    Cuisine: Italian (World)
    Serving: 3 Persons

    Ingredients

    • 8 Slices of bread(Any bread of your choice)
    • 2 tbsp butter
    • 3 to 4 medium-sized garlic cloves (Lahsun) (Minced or grated)
    • Red chili flakes as required
    • dry oregano as required
    • black pepper (Optional)
    • Salt as required, to be added if using unsalted butter
    • 1 cup Mozzarella cheese, grated

    For Garnishing

    • chopped Coriander leaves

    How To Make Cheese Garlic Bread


    Step 1

    Heat Tawa on a high flame.

    Step 2

    In a small bowl combine butter garlic oregano and you can add boiled sweet corn if you like it mix it well.

    Step 3

    When the tawa becomes hot reduce the flame to a low or medium. Then place the bread slices. Cover the bread slices with a lid.

    Step 4

    Keeping the slices covered, roast till light golden and a bit toasted at the edges. If you want a crisper toasted texture, then you can toast the bread slices for some more minutes.

    Step 5

    Once the garlic bread has got lightly toasted from the edges, sprinkle all ingredients which we mixed in a bowl and sprinkle your favourite herbs or spice from the top.  I added red chili flakes and some dried oregano.

    Step 6

    Now Sprinkle the grated mozzarella cheese over the bread slices. place cheesy garlic bread on Tawa until cheese is melted and bread is crisp from the side.

    Step 7

    Once done, remove from tawa and garnish with chopped coriander leaves. Serve Cheese Garlic Bread hot or warm.


    Note

    • You can add capsicum, boiled sweet corn, or your choice of ingredients.


    Previous                                     Home                                      Next

    Friday, November 29, 2019

    Farsi Puri Recipe (Gujarati Snack For Diwali)

    For Gujarati, Diwali is incomplete without Farsi Puri. This deep-fried dry snack has evergreen fanfare, and you will understand why if you just try it once. The best Farsi puri recipe! It is a crispy, flaky with a melt-in-your-mouth textured snack that tastes best when served a hot cup of tea.

    "Farsi" in Gujarati(kathiawadi) means "crispy" and thus the name. This recipe is usually made during the Diwali festival. Normally Gujjus celebrate their New year on the next day of Diwali and during this day we have many guests at home. This puri is served as a snack. Along with Farsi puri, we also make tikha gathiya, sev, chakli, and makai poha chevado

    Like any other snacks recipe, this Farsi puri can be prepared in advance and store in an airtight container for around 15-20 days. Avoid exposing them to air and they will remain crisp for a long time.

    Let me share today a recipe that I usually make during Diwali. They are very easy to make and they are too much testy and go really well with tea or coffee.


    Prep time
    Cook Time
    Total Time
    10 Minutes
    30 Minutes
    40 Minutes


    Author: Creative Baby
    Recipe Type: Snacks
    Cuisine: Gujarati (Indian)
    Serving: 4 persons

    Ingredients

    • 2 cups plain flour (maida)
    • 2 tbsp semolina (Rava/sooji) (optional)
    • 2 tbsp coarsely crushed black pepper(kalimirch)
    • 3 tbsp melted ghee
    • salt to taste
    • oil for deep-frying
    • 1 tbsp cumin seeds (Jeera)
    • 1/3 cup water

    How To Make Farsi Puri


    Step 1

    Add the flour in a bowl and add cumin seeds, coarsely ground black pepper, and salt to taste.

    Step 2

    Make a weel in the flour and pour ghee in the flour. Mix all the ingredients very well.

    Step 3

    Mix well and knead into a stiff dough using a little water.

    Step 4

    Divide the dough into 24 equal portions and roll each portion into a 50 mm. diameter thin circle. you can roll it as per your choice size.

    Step 5

    Prick the puris all over using a fork or knife.

    Step 6

    Heat the oil in a deep non-stick kadhai, and deep-fry a few puris at a time, on a slow flame till they turn light brown in colour from both sides. Drain on an absorbent paper.

    Step 7

    Cool completely, Your Gujarati Farsi puri is ready now. Store them in an air-tight container.


    Previous                                      Home                                    Next

    Gajar Halwa (Carrot Halwa) Recipe

    Gajar ka Halwa or Carrot Halwa is a traditional  Indian sweet or dessert made with fresh red carrots, milk, and sugar. It's a winter delicacy and is made using juicy red carrots. Carrot halwa is popularly known as Gajar ka halwa. It makes its presence on most special occasions like festivals, celebrations, and parties. Gajar ka Halwa is one of the classic Indian Sweets. that would not fail to impress anyone.

    Most Indian households make this gajar halwa during winter as carrots are in full seasons. It is flavored with cardamom powder & garnished with chopped nuts.


    Prep Time
    Cook Time
    Total Time
    10 Minutes
    50 Minutes
    60 Minutes


    Author: Creative Baby
    Recipe Type:  Desserts, Sweets
    Cuisine: North Indian, Panjabi
    Serving: 6 Persons

    Ingredients

    • 1 kg (750 grams) Carrot or (prefer juicy carrot)
    • 4 cups full fat organic milk
    • 4 tbsp ghee
    • 10 to 12 tbsp regular sugar(add as required)
    • 5 to 6 green cardamom-powdered 
    • 10 to 12 whole cashews (chopped)
    • 10 to 12 almonds- sliced or chopped
    • 2 tbsp raisins(optional)
    • 1 pinch saffron strands(optional)

    How To Make Gajar Halwa


    Step 1

    Wash carrots under running water & peel them. Greate them in a food processor or with a hand grater.

    Step 2

    Add the carrots and milk in a heavy bottom pan and cook on low flame heat until all the milk is absorbed.

    Step 3

    On a low to medium flame, bring the whole mixture to boil and then simmer. while the mixture is simmering on a low flame, keep on stirring in between. The grated carrots will cook on the milk and the milk will start to reduce and evaporate.

    Step 4

    When the milk has 75% reduced, Add ghee, sugar in the pan along with cardamom powder to the mixture. Sugar will release a lot of moisture and will make the entire carrot halwa gooey.

    Step 5

    Stir well and continue to simmer and cook on a low flame. Do keep on stirring the halwa in between. Saute the carrot halwa well in ghee until the moisture evaporated completely.

    Step 6

    Towards the end, add the cashews, almonds, saffron, and raisins. Simmer the halwa till all the milk is evaporated. Switch off the burner.

    Step 7

    Serve Gajar halwa hot, warm or you can also serve it cold. Garnish with some chopped dry fruits while serving.


    Note

    • Use fresh, juicy, and tender carrots.
    • Use full-fat milk or whole milk.
    • Add nuts and dry fruits of your choice.
    • The halwa stays good in the fridge for almost about a week.
    • Do not fry the grated carrot before adding milk otherwise, it will turn dark in color.


    Previous                              Home                                 Next          

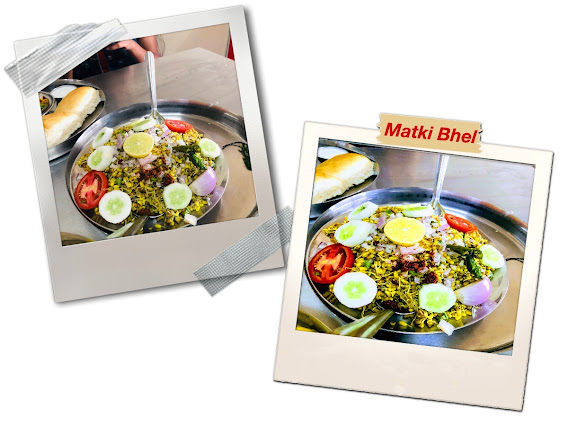
    Mataki Bhel- Maharashtrian Special Sprouts Bhel

    Matki bhel, a marvelous creation to spice up your day. Sprouts are very healthy if you eat them in the morning, they are good sources of vitamins and proteins, good for every age of the person. 

    Enjoy this delicious and healthy chat item. This Matki Bhel/ Sprouts Bhel is very easy to male and very very healthy. You can also use any other favorite sprouts of your choice to make this sprouts recipe.

    The relishing flavors, the appealing texture and the amazing aroma of the Matki bhel is just mouth-watering. The amazing recipe is provided here.


    Prep Time
    Cook Time
    Total Time
    25 Minutes
    0 Minutes
    25 Minutes

    Author: Creative Baby
    Recipe Type: Breakfast
    Cusine: Maharashtrian (Indian)
    Servings: 4 Persons

    Ingredients

    • 2 cups Sprouted Moth(matki)
    • 1 medium Onion finely chopped
    • 1 medium tomato finely chopped
    • 1/2 tbsp Red chili powder
    • salt to taste
    • 1 tbsp Lemon Juice 
    • 1/2 Bowl namkeen mixture
    • 1 tbsp Chat masala

    For Garnishing

    • Chopped coriander leaves
    • Sev
    • Onion slice, Tomato slice

    How To Make Matki Bhel


    Step 1

    Put the sprouts in a vessel and wash it with clean water. Boil the sprouts in water for 5 to 10 minutes. Turn off the gas after 10 minutes. take out all the water from the sprouts. Take sprouts in a big bowl.

    Step 2

    Add onion, tomatoes, red chili powder, namkeen mixture, chat masala, and mix it well.

    Step 3

    Now add lemon juice and salt s per taste and mix it well.

    Step 4

    Take matki bhel in a serving plate and garnish it with coriander leaves, sev and Onion slice, tomato slice.
    Our Spicy Matki bhel is ready.


    This breakfast is considered a very healthy breakfast. Many people like to start the day with this breakfast. If you make it this way, then the children will also like it and they will stay away from junk food.

     Previous                                    Home                                      Next

    Thursday, November 28, 2019

    Pav Bhaji Recipe

    Pav bhaji is a fast food dish from India, consisting of a thick vegetable curry served with a soft bread roll. Its origins are in the state of Maharashtra.

    Pav is an Indian bread and bhaji is mashed vegetables cooked with spicey powder. Pav bhaji is a popular Indian street food that consists of a spicy mix vegetable mash & soft buns. It is a perfect party food that can be made in advance. 

    This post will guide you to make the easiest & best pav bhaji that tastes delicious and flavorful.


    Prep Time
    Cook Time
    Total Time
    15 Minutes
    15 minutes
    30 minutes

    Author: Creative Baby
    Recipe Type: Breakfast, Dinner
    Cuisine:   Maharashtrian (Indian)
    Serving: 4 Persons

    Ingredients

    • 2 Medium Potatoes (approx 1½ cups chopped)
    • 1/2 cup Green Peas( Fresh pr Frozen)
    • 3/4 cup chopped cauliflower
    • 1/2 cup Chopped Capsicum
    • 2 Medium Finely chopped onions.
    • 1 cup chopped carrot
    • 1/3 cup chopped fresh beans(optional)
    • 2 Medium Finely chopped Tomato
    • 1 tbsp Ginger Garlic  green chili Paste
    • 1½ tbsp Red chili powder
    • 1/4 tbsp Turmeric Powder
    • 1 tbsp Cumin-Coriander powder
    • 1 tbsp Lemon Juice
    • Salt to taste
    • 1 tbsp Readymade Pav Bhaji Masala Powder
    • 2 tbsp Oil + 2 tbsp Butter
    • 1 tbsp Cumin seeds

    For Garnishing

    • 1 tbsp Butter
    • 3 to 4 tbsp chopped coriander leaves

    For Serving

    • 1 Medium Finely chopped onion
    • 1 Lemon  wedges
    • 1 Medium finely chopped tomato
    • 12 Pavs

    How To Make Pav Bhaji


    Step 1

    Add all the vegetables like potatoes green peas, carrot,  cauliflower into the pressure cooker. You can add veggies of your choice. Pour water to partially cover them and cook until soft tender.

    Step 2

    If cooking in the cooker, let it whistle twice. When the pressure release opens the lid and mashes them well.

    Step 3

    Heat a pan or Kadhai. add 2 tbsp oil and 2 tbsp butter together. Add chopped onion and ginger-garlic paste. saute until onion turns translucent.

    Step 4

    Add chopped tomato and green peas and capsicum Saute until tomatoes and peas and capsicums turn soft.

    Step 5

    Add all spices like turmeric powder, red chili powder, cumin-coriander powder, and readymade pav bhaji masala powder. stir and cook for a minute.

    Step 6

    Add boiled and mashed vegetables. Add all of the stock or water from the pressure cooker in which the veggies were cooked. Add1 tbsp lemon juice. Mix very well.

    Step 7

    Cook for 4-5 minutes. Taste for the salt at this stage and add more if required. Turn the flame. Add chopped coriander leaves and mix well. Bhaji is ready for serving. 

    Step 8

    Heat a Tawa or a shallow frying pan. Keep the flame to a low and then add butter or oil. When the butter begins to melt, place the pav on the butter and toast for 1 or 2 minutes.

    Step 9

    Pav bhaji is ready to serve. Garnish with a cube of butter. Garnish it with your favorite ingredients.
    Serve hot with butter-roasted pav, sliced onion, tomatoes, and lemon wedges.


    Notes

    • Add veggies like brinjal, broccoli, french beans, etc as per your preference for variation in taste texture.
    • The spice powders can be easily adjusted to suit your taste.
    • Garnish the hot bhaji with grated mozzarella cheese to make cheese pav bhaji.


    Previous                                   Home                                        Next


    Wednesday, November 27, 2019

    Gujarati Methi Thepla Recipe

    Gujarati methi thepla is a very popular Gujrati Breakfast dish made with flour, spices and fresh fenugreek leaves(Methi). It is soft and very testy which can be had at any time of the day. Thepla is similar to Paratha. Methi theplas are light and as well as healthy. a good snack for children who don't like greens, especially fenugreek. This way you can incorporate some greens in their diet. Methi thepla is an all-time favourite ar home. 

    Most Gujaratis love eating their Theplas with curd or mango pickle known as aam ka chunda. These are commonly & often prepared in most Gujarati households not only for breakfast but also for their meal, snack & even to enjoy during their travel.

    They can also be carried to work or school in their lunch box with pickel& some Sabji.


               Prep Time           Cook Time          Total Time
               10 Minuets         30 Minutes       40 Minutes


    Author: Creative Baby
    Recipe  Type: Breakfast
    Cuisine: Gujarati (Indian)
    Servings: 4 People

    Ingredients

    • 2 Cups Whole Wheat Flour ( Gehu Atta)
    • 1/2 Cup  Chickpea Flour (Besan) Optional
    • 1 Cup Fenugreek Leaves Chopped (Methi)
    • 1/2 Cup Curd (Dahi) Optional
    • 1 Tbsp Green Chilli, Ginger and Garlic Paste
    • 1/4 Tbsp asafoetida (Hing)
    • 1/2 Tbsp Cumin Seeds (Jeera)
    • 1/2 Tbsp Turmeric Powder (Haldi)
    • 1/2 Tbsp Red Chilli Powder
    • Salt To Taste
    • Oil for roasting thepla as required

    For Serving

    • Mango Pickle (Aam Ka Chunda)
    • Curd
    • Tea

    How To Make Methi Thepla


    Step 1

    Pluck the methi leaves. Rinse them well a few times. Drain to a colander. Chop finely.

    Step 2

    Take a mixing bowl to add flour to the bowl and add all the spices and herbs.

    Step 3

    Add the chopped methi leaves. Mix nicely with your fingertips. add curd or add very little water instead of curd.

    Step 4

    Mix again and knead into a dough. Don't add water while kneading as methi leaves release water.

    Step 5

    Cover and keep the dough for 10-15 minutes.

    Step 6

    Add a tbsp of oil in the bowl and knead the dough again for a minute.

    Step 7

    Divide the dough into 10 equal balls.

    Step 8

    Dust and roll the balls to a 6-7 inch circle

    Step 9

    Heat a griddle.

    Step 10

    Keep the thepla on the hot griddle and cook from both the sides till brown spots appear.

    Step 11

    Apply 1 tbsp oil on both the sides and cook till spots darken and the thepla is cooked.

    Steps 12

    Keep pressing the thepla with a flat spoon while it cooking.

     Steps 13

    Now Methi theplas are ready. Serve hot with pickle and curd or tea.


    Notes

    If you are making the theplas to store and eat later, do not add besan to the dough. It will Keep your theplas soft for a longer time. But If planning to eat hot thepla, besan will add a nice crunch.


    Previous                              Home                                  Next


    Bhavnagar Street Food- Bhungla Batata Recipe | Kathiyavadi Special-Lasaniya Batata

    To make more excited your day with spicey Bhungala  Batata. This is all-time favorite street food in Gujarat. It is quite spicy baby potatoes with garlic flavored.  It is quite spicy to balance the spiciness, these potatoes served with crispy long fryums. The combo is simply awesome and must try it.


    Prep Time Cook Time Total Time
    10 Minutes 12 Minutes 22 Minutes


    Author: Creative Baby
    Recipe Type: Lunch Or Dinner
    Cuisine: Gujarat (Indian)
    Serves: 4 Persons

    Ingredients

    • 1/2 kg boiled baby potatoes
    • 3 tbsp Oil
    • 1/2 tbsp Cumin Seeds (Jeera)
    • 1/2 tbsp Asafoetida (Hing)
    • 2 tbsp Garlic (Lehsun) Paste
    • Salt as per taste
    • 2 tbsp Red chili Powder (Adjust as per taste)
    • 1 tbsp Coriander Powder

    For Serving

        2 Cups of Pipe Fryums (Bhungla)

    For Garnishing

      Chopped Coriander Leaves (Dhania)

    How To Make Bhungala Batata

    Step 1

    Boil Baby Potatoes and peel it. Mash some potatoes from it. 

    Step 2

    Heat oil in a cooking pan and add cumin seeds and asafoetida in it and let them smell.

    Step 3

    Now add garlic paste and saute it on low flame for a minute.

    Step 4

    Then add boiled baby potatoes into the cooking mixture in the pan. Take mash potatoes in a bowl. Add 4 tbsp water into mash potatoes. Add those mashed potatoes into the pan. saute it for a while.

    Step 5

    Now add red chili powder and coriander powder and salt in that mixture. now saute it for a minute.

    Step 6

    Mix well. Take out this in a serving dish and garnish it with chopped coriander leaves. Your Spicy Batata is ready to serve.

    Step 7:

    Served it immediately with pipe fryums.


    Now Yummy Tasty Bhugla Batata ready.


    Previous                                  Home                                         Next


    Tuesday, November 26, 2019

    Gujarati Khatta Steam Dhokla Recipe


    Gujarati Khatta Dhokla is one of my favorite dish to make as well to eat. Khatta Dhokla is a great recipe that you will lead everyone to shower you with a lot of compliments. The term khatta means sour and this khatta flavor is coming from fermented better. Gujarati Khatta Dhokla has a signature sour taste which is what makes so many people a fan of it. This dish is usually served as a side dish or snack throughout the country. In many parts of Gujarat. It is light, healthy, and easy to make snack dish at home. Just read the steps and follow them as they are. We assure you that your Khatta Dhokla will be ready then! Don’t forget to share this amazing recipe with your family and friends.


    Author: Creative Baby
    Recipe type: Breakfast
    Cuisine: Gujarati ( Indian)
    Serves: 4

    Ingredients

    2 cup rice small sort grain
    1 cup chickpea lentils ( Chana Daal)
    ½ cup sour curd (Dahi, Yogurt)
    4-5 green spicy chillies
    1-inch ginger
    salt to taste
    1 tbsp turmeric powder
    4-5 cloves garlic minced
    2 tbsp fruit salt or ½ tbsp citric acid or ½ tbsp baking soda 


    How To Make Gujarati Khatta Dhokla

    Step 1

    Take rice and chickpea lentils (chana daal) in a bowl. And soak them for at least 8 hours.

    Step 2

    After 8 hours of soaking, grind both ingredients very roughly in a grinder. Don't make a smooth paste of it. Now add sour curd into the mixture and cover mixing bowl with lid and put in a warm place for fermentation for at least 8-12 hours depends on weather conditions. Typically during the summer, you require quite less time for fermentation.

    Step 3

    Now the mixture is ready to use. Make a smooth paste of chillies, ginger(, and garlic). Add that paste into the fermented mixture.

    Step 4

    Add turmeric powder and salt to taste.

    Step 5

    Meanwhile, boil 2 to 3 cups of water in an electric cooker or pressure cooker or steamer pan or Dhokla maker. The amount of water to be added depends on the size of the steamer or pressure cooker. And bring the water to boil. 

    Step 6

    Grease a steamer pan with oil.

    Step 7

    The ingredient which we use to ferment the dhokla batter is fruit salt. Indian brand of fruit salt is eno. You can use baking soda or soda bicarbonate. However baking soda gives the soapy aroma if used in excess. You should add baking soda just before you are ready to steam it. Finally, pour the mixture into a greased pan and put coriander leaves at the top And sprinkle some red chilli powder on it. 

    Step 8

    Steam it for 10-15 minutes check by inserting a knife or toothpick in it if it comes out clean than it is ready. Let it cool for five minutes. Then cut it in diamond or square shape. Now your dhokla is ready to eat.

    Step 9

    Serve warm with Green Chutney Or oil and garlic paste.


    Note

    You can add a crushed bottle guard if you like it. crushed bottle guard and add it into better when you add all the ingredients.


    Previous                                  Home                                 Next

    Monday, November 25, 2019

    Welcome To Gujju's Khana Khajana Blog


    Hello and welcome to my first food blog. My name is Creative Baby. I love cooking. I am always making different types of recipes at my home and now I am so excited to share those different recipes on my blogs.

    so, this is my first post! On my food blog! At long last, it took me long enough to get around to it, and now, even if I am the only person that reads this I can at least be happy that I did it.

    Glad you came by. I wanted to welcome you and let you know I appreciate you spending time here on the blog very much.  Everyone is so busy and life moves pretty fast,  so I really do appreciate you taking time out of your busy day to check out my blog!. Thanks.

    Another thing I will always appreciate your feedback on the blog.  If you have any comments or suggestions I welcome them and would love to hear them Always. Not that all criticism is a fun thing but I think honest criticism given in an honest positive manner is something we can all learn and grow from if we are open to hearing it.  I will always listen to your ideas.  So I do welcome your suggestions for the blog...

    I will start sharing different recipes on my blog very soon.

    Thanks for letting me,

    Creative Baby